Are you interested in dropshipping and want to create your own dropshipping website on Shopify? You’ve come to the right place! In this comprehensive guide, we’ll explain step-by-step how to create a high-converting dropshipping online store on the Shopify platform.
What is dropshipping?
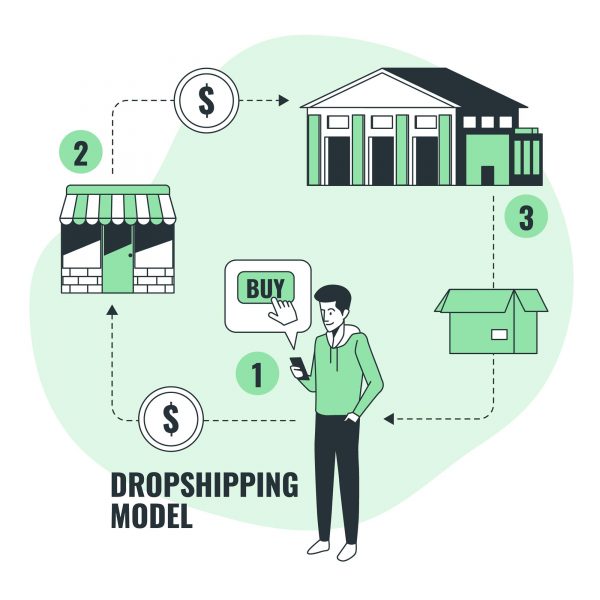
Dropshipping is a business model where you, as the store owner, don’t keep the products you sell in stock. Instead, when you sell a product, you buy it from a third party (usually a wholesaler or manufacturer) who ships the product directly to your customer. It’s an efficient and cost-effective way to do business, and it’s particularly popular among online entrepreneurs.
Why choose Shopify for dropshipping?

Shopify is an e-commerce platform that enables businesses of all sizes to create their own online store. It offers a host of features and tools to help businesses succeed, including:
- A user-friendly interface: Even if you have no experience in website design, you can create a dropshipping website on Shopify. The platform is easy to use and includes customizable design templates.
- Dropshipping integrations: Shopify integrates with popular dropshipping apps like Oberlo, making it simple to manage your products and suppliers.
- Integrated marketing and SEO tools: Shopify offers many tools to help optimize your site for search engines and promote your business.
To learn more about Shopify, we’ve dedicated a full platform review to it.
How to make a dropshipping website with Shopify in 7 steps
Step 1: Register with Shopify
The first step to learning how to make a dropshipping website with Shopify is to open your Shopify account.
Here’s how to do it:
- Go to the Shopify website.
- Follow the sign-up instructions to create your account.
- Choose an offer
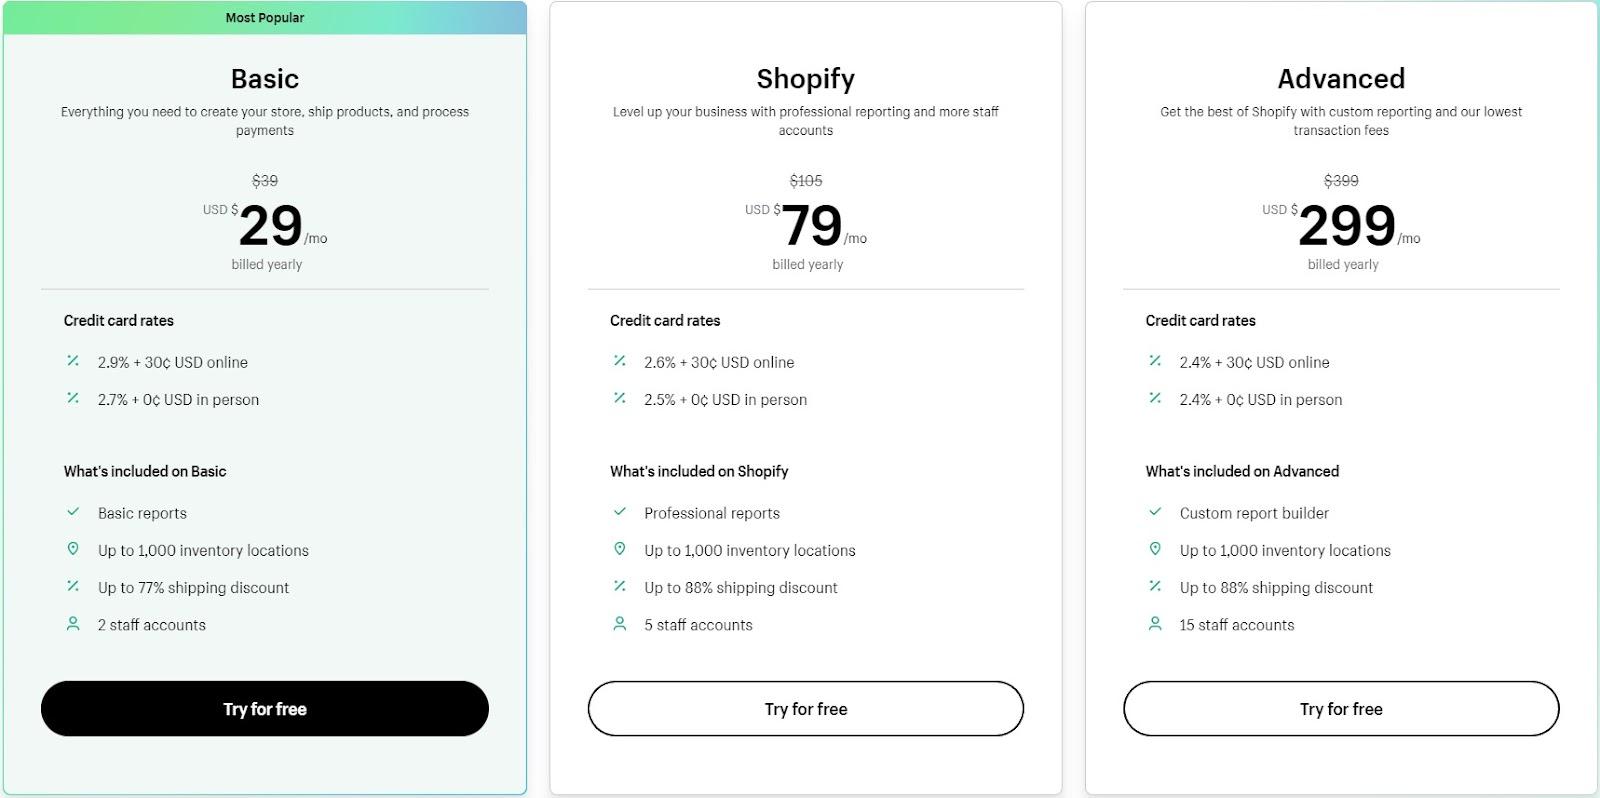
The Shopify trial is an excellent opportunity to experiment and familiarize yourself with the tools and options offered by the platform. Use this period to customize your store, add products and discover the order and payment management features.
However, thanks to our partnership, Shopify is offering new users a 90-day trial for just $1 to test its features.

Create your Shopify store for only $1 during 90 days
Step 2: Choose a niche and find dropshipping products
Before building your dropshipping store on Shopify, it’s essential to choose a profitable niche and find matching products. Here’s how to do it:
Choose a niche:
Identify a specific niche with reasonable demand and competition. Think about your interests, skills and market trends. The more focused your niche, the better you’ll be able to attract a specific audience.
Find dropshipping products:
Search for reliable dropshipping suppliers on platforms such as AliExpress or CJ Dropshipping. Select products that fit your niche and meet the needs of your target audience.
When choosing your products, consider the following factors:
- Product quality
- Supplier reviews
- Delivery times

If you have no idea what products to offer in your store, use Dropispy. It’s an application for spying on dropshipping ads on Facebook. You’ll be able to identify products or niches of real interest.
To find out more, we’ve put together a guide to help you spy on your e-commerce competitors’ social networks.
Step 3: Customize your Shopify store
Once you’ve claimed your free trial on Shopify and found your dropshipping products, it’s time to customize your online store. Follow these steps to customize your Shopify store:
Choose a suitable theme

First impressions are crucial to the online shopping experience. That’s why choosing the right theme for your store is such an important step. A well-chosen theme can not only attract your visitors’ attention, but also encourage them to browse your site further, increasing the chances of conversion.
- Log in to your Shopify account. On the dashboard, select “Online Store” from the left-hand menu, then click on “Themes“.

- You’ll see a list of current themes. To add a new one, click on “Visit Theme Store” in the top right-hand corner.
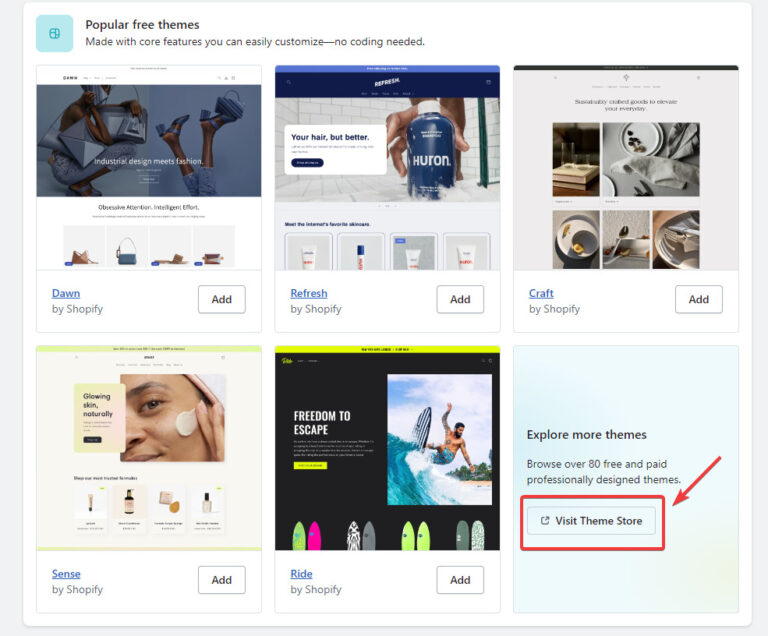
- Browse the Shopify theme store. You can filter themes by industry, features, price (free or paid), etc.
- Once you’ve found a theme you like, click on it to display a details page where you can see a demo and read more about its features.
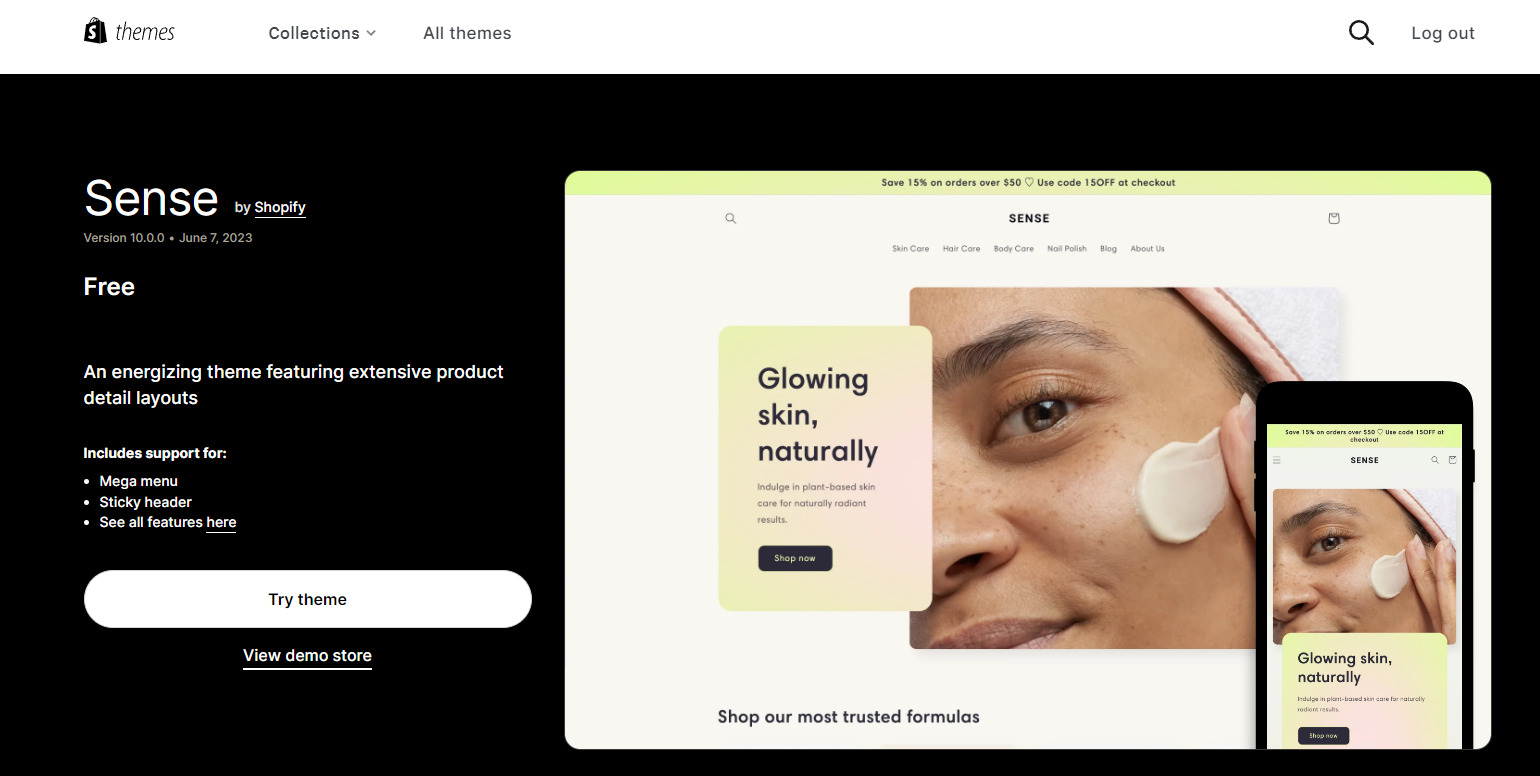
- If you like the theme, click on “Add theme to library“. The theme will then be added to your library and available for customization.
Remember, if you’re just starting out and your budget is limited, the free themes offered by Shopify are more than enough to get you started testing your store. You can then invest in a paid theme once you’ve generated sales and are ready to further enhance your store’s aesthetics.
Once you’ve chosen your store theme, the next step is to create a strong, memorable visual identity for your brand. This is an essential process that will help you stand out from the competition and build an emotional connection with your customers.
Creating a visual identity

A strong, consistent visual identity can help give your store a personality and create a memorable user experience. Your logo and color choices are the pillars of this identity and can greatly contribute to your customers’ perception of your brand.
- Go back to your Shopify dashboard, select “Online Store” and “Themes“.
- Find the theme you’ve just added, then click on “Customize“.

- You’ll be redirected to the theme editor. To add your logo, click on “Header” in the left-hand menu, then in the “Logo” section,

- click on “Select Image“. Upload your logo from your computer.

- Return to the editor’s main page, then select “Theme settings“. Click on “Colors“. Here you can customize the main colors, text colors, button colors, etc. Be sure to follow a consistent color palette that reflects your brand.

If you don’t have a logo yet, Shopify offers a free logo creation tool. What’s more, Shopify offers a bank of free images that you can use to add visuals to your store.
Once you’ve created an attractive visual identity, it’s time to focus on your store’s content. You’ll want to fill your site with information that’s relevant and useful to your customers. This is where the creation of key pages comes in.
Creating key pages

Your site’s key pages play a crucial role in communicating what you offer your customers. These are the pages that provide essential information about your company, products and services, and make it easy for your visitors to navigate.
For example:
- The home page is the first page most visitors see when they arrive on your site. It should be attractive, easy to navigate and contain an overview of what you offer.
- The “About” page is also a key page. It’s your chance to tell your company’s story, share your mission and give customers a reason to do business with you.
- The products page is where you detail the items you sell. It should be well organized, offer accurate descriptions of each product, and feature high-quality photos.
- A FAQ (Frequently Asked Questions) is another key page. It answers common questions customers may have about your products or services, which can help increase conversions and improve customer satisfaction.
- The contact page gives customers an easy way to reach you with any questions or concerns. It can include an e-mail address, a phone number, and possibly a contact form.
Finally, don’t forget to create pages for your delivery, return and privacy policies. These pages inform your customers about their rights and obligations when doing business with you, and can help build trust.
To do this:
From your Shopify dashboard, select “Online Store” and “Pages“.

- Click on “Add Page“. Give your page a title (e.g. “About us” or “Contact”).

- In the text box, add the content of your page. You can format the text, add images, links, etc.

- Once you’ve finished, click on “Save“. Repeat this process for each key page on your site.
While key pages are the heart of your store, search engine optimization (SEO) acts as the engine that propels your store to the digital forefront. Good SEO can help increase your store’s visibility and attract more qualified traffic.
SEO optimization

SEO optimization is an essential aspect of any online store. By improving your SEO, you can increase your store’s visibility on search engines, attract more traffic to your site and, ultimately, increase your sales.
A good starting point is to use AI tools, such as Chat GPT, to help you write SEO-optimized product titles and descriptions.
- When creating or editing each page, scroll down to “Search engine listing preview” and click on “Edit Website SEO“.

- You can then optimize the “Page Title” and “Meta Description“, including relevant keywords. The “URL and Handle” can also be modified.

Once you’ve optimized your store for search engines, the next step is to configure the technical details of your store, such as product prices and payment gateways. This is a crucial step in ensuring that your store runs smoothly and provides a seamless shopping experience for your customers.
Configuring prices and payment gateways
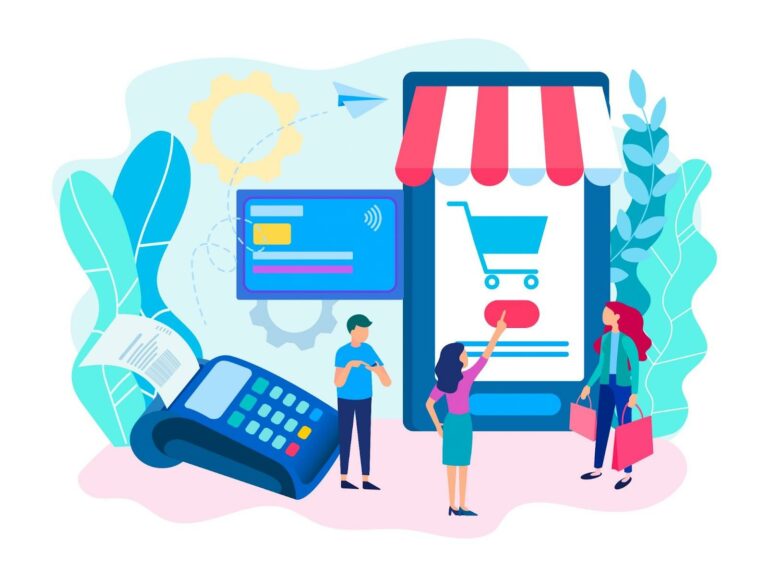
Setting your product prices and configuring your payment gateways are essential elements in managing your online store. Not only are these technical details important for your business, they also have a direct impact on your customers’ shopping experience.
- To configure your product prices, go to “Products“, then “All Products”.

- Click on a product to modify it, and set its price in the “Price” field..

- To configure payment gateways, go to “Settings” in the left-hand menu, then “Payments”.

- Shopify then gives you a choice:
Click on “Activate Shopify Payments”, if you wish to use Shopify’s in-house gateway.

Click on “See all other providers“, if you wish to use a third-party payment gateway. Additional charges will be applied to each order.
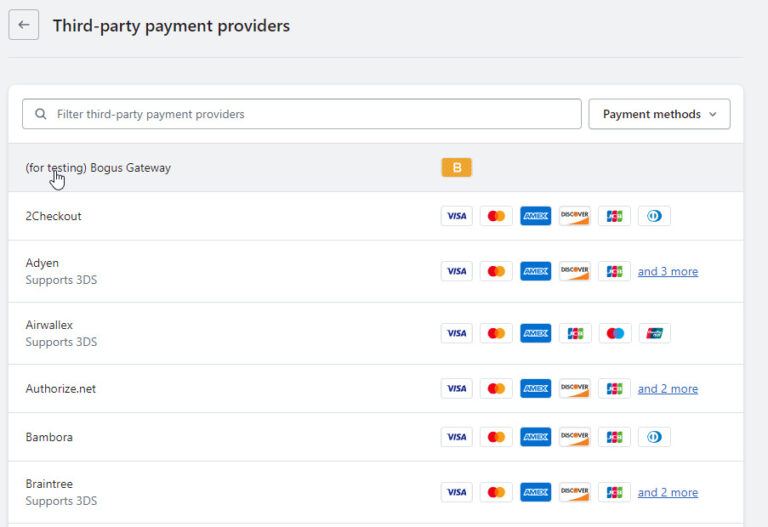
Once these technical aspects are in place, it’s time to focus on the legal aspects of your store. In particular, you need to define your store’s policies to inform your customers of their rights and responsibilities when buying from you.
Store policies
Defining your store’s policies is an essential step in protecting your business and building trust with your customers. Whether it’s your refund, privacy or delivery policies, every policy needs to be clear and easy for your customers to understand.
- From the “Settings” menu, select “Legal“.
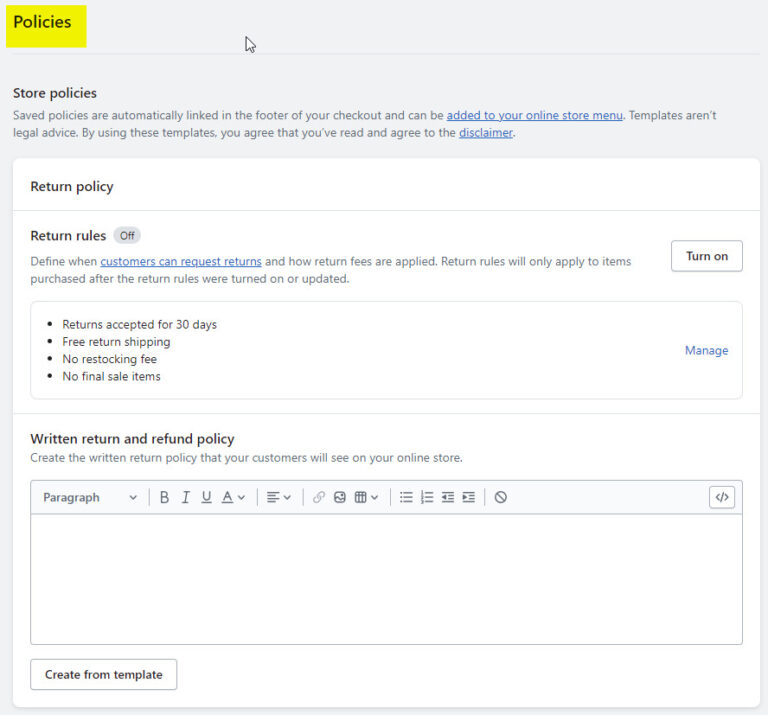
- Fill in the fields for “Refund“, “Privacy“, “Terms of Service“, and “Shipping” policies. If you need help, Shopify can generate sample policies for you.
To help you with this task, Shopify provides a policy generator. All you need to do is provide some key information about your store and the tool will take care of the rest.

Now that you’ve set up the essentials of your store, the final step is to choose a domain name. A good domain name can not only enhance your store’s credibility, but also make it easier for search engines to find your site.
Domain name

Choosing the right domain name for your store is an important decision. A domain name that’s easy to remember and relevant to your business can reinforce your store’s brand and make it easier for potential customers to find your site.
- From your Shopify dashboard, select “Online Store”, then “Domains”.

- You can choose “Buy new domain” to purchase a new domain through Shopify, or “Connect existing domain” if you already have one.

However, if you’re in the testing phase and haven’t yet found the right product, it may be wiser to opt for a generic brand name rather than a specific product name.
This will prevent you from spending money unnecessarily if you change products. If you lack inspiration, Shopify also offers a brand name generator tool to help you find the perfect name for your store.
Step 4: Set up payments and customer management
To manage payments and customer management, follow these steps:
Payment options :

Configure payment options on your Shopify store. Shopify offers various payment gateways such as Shopify Payments, PayPal, Stripe, etc. Choose the options that best suit your business and your customers.
Customer service:
Order tracking:
Use an application like Aftership to track packages sent by your suppliers. Provide your customers with tracking information so they can follow their orders.
Step 5: Develop your marketing strategy
A key step in knowing How to make a dropshipping website with Shopify is traffic generation. To promote your dropshipping store, you need to develop an effective marketing strategy. Here are a few tips to help you:
Use social media:
Create profiles on social media platforms relevant to your niche. Share interesting content, engage with your audience and use targeted advertising to attract visitors to your store.
Create quality content:
Write blog posts, create videos and infographics relevant to your niche. Share this content on your website and social networks to attract traffic and establish your expertise.
Collaborate with influencers:
Identify influencers in your niche and offer them a partnership. They can promote your products to their audience, which will help you increase your visibility and credibility.
Optimize your SEO:
Use relevant keywords in your product descriptions, titles and tags. Also optimize your site’s loading speed, improve mobile-friendliness and get quality links to boost your search engine rankings.
Step 6: Optimize your store for mobile devices
Optimizing your store for mobile devices is essential to reach a wide audience. With more and more people shopping online from their cell phones, you can’t afford to ignore this audience.
Here are some tips for optimizing your Shopify store for mobile devices:
Choose a responsive theme:
Be sure to select a theme that is specifically designed to be responsive on mobile devices. Responsive themes automatically adjust to different screen sizes, providing a smooth and enjoyable user experience.
Simplify navigation:
On mobile devices, space is limited, so it’s essential to simplify navigation. Use drop-down menus, intuitive icons and clear call-to-action buttons to make it easy for your visitors to navigate.
Optimize loading speed:
Mobile users are impatient, and a store that takes too long to load can drive them away. Optimize your store’s loading speed by compressing images, reducing scripts and optimizing code.
Test your store on different devices:
Make sure your store is compatible with different mobile devices and browsers. Test it regularly to ensure that it displays correctly and offers a smooth user experience.
Step 7: Implement advertising strategies

To attract traffic to your dropshipping store, it’s essential to implement effective advertising strategies. Here are a few strategies to consider:
Paid advertising:
Use advertising platforms such as Facebook Ads, Google Ads and Instagram Ads to promote your products. Target your audience by interest, age and location to maximize the effectiveness of your ads.
Influencer marketing:
Collaborating with influencers in your niche can help you reach a wider audience. Search for relevant influencers on social networks and offer them a partnership to promote your products.
Content marketing:
Create quality content in the form of blog posts, videos and infographics. Provide useful and engaging information related to your niche to attract your audience’s attention and reinforce your credibility.
Marketing on social networks:
Use social networks to promote your store and engage your audience. Share engaging content, respond to comments and use targeted ads to increase your visibility.
As you’ll have understood, in addition to the strategies you’ll be implementing, the choice of applications is a crucial element for your dropshipping store.
To make things easier for you, we’ve compiled a list of the best Shopify applications for boosting your e-commerce in our dedicated article.
Conclusion
By following this comprehensive guide on How to make a dropshipping website with Shopify, you now have the knowledge you need to start your online business. Shopify offers a user-friendly and powerful platform, ideal for dropshipping.
By choosing profitable products, working with reliable suppliers, optimizing your store for mobile devices and implementing effective advertising strategies, you can create a successful dropshipping store.
Don’t forget to create quality content in the form of blogs to attract organic traffic and choose a personalized domain name to reinforce your brand image. Launch your dropshipping store on Shopify and get ready to make your online entrepreneurial dreams come true.
FAQ
How long does it take to create a dropshipping website on Shopify?
The time it takes to create your dropshipping website on Shopify depends on various factors such as the complexity of your store, product selection, theme customization, etc. On average, it can take a few weeks to set up a basic store, but this can vary depending on your specific needs.
Do I need any technical skills to set up a dropshipping store on Shopify?
No, you don’t need advanced technical skills to create a dropshipping store on Shopify. The platform is user-friendly and offers ready-to-use themes. What’s more, there are plenty of tutorials and resources available to help you get started.
What are the costs associated with creating a dropshipping website on Shopify?
The costs associated with creating a dropshipping website on Shopify include the monthly Shopify subscription, custom domain fees, optional third-party applications, advertising costs, etc. It’s important to plan your budget accordingly and take these costs into account when planning your business.
How can I attract traffic to my dropshipping store on Shopify?
To drive traffic to your dropshipping store on Shopify, you can use online marketing strategies such as paid advertising, influencer marketing, content marketing and social media. It’s also important to optimize your store for search engines and provide quality content to attract organic traffic.
